We Have Moved

Dear Friends, I have moved this blog to a new domain and from now on i will be posting there. For latest posts please visit my new blog at

Breaking News

Friday, August 22, 2014

Modeling a Three wheeler electric car in solidworks - Part 1

three wheeler car modeling in solidworks


This is the most basic design of a three wheeler car modeled by using solidworks, this car will be powered by electricity. In this post i will be discussing about the design and this car is designed entirely from scratch. In the following posts i will be discussing about the tutorial of modeling the car in solidworks.

car modeling tutorial in solidworks

This car is typical for golf courses, airports or other public places and as it is powered by electricity so no point of air pollution is there. After modeling the car in solidworks i have rendered the model by using PhotoView 360, a very good add on package by solidworks for rendering. This model of the three wheeler car is not yet complete if you have any suggestions please comment out i will change it according. I will be posting about the tutorial for modeling the car in solidworks in my next post.


car modeling tutorial in solidworks

Hope you have liked my modeling of the three wheeler car in solidworks, please comment if you find any mistakes. Friends stay connected with us for tutorial for modeling this concept car in solidworks in our next post.
car modeling tutorial in solidworks


In the mean time you can also check my other modeling and its tutorials in solidworks.


Read more ...

Tuesday, August 12, 2014

Mobile Phone modeling tutorial in SolidWorks

mobile phone modeling tutorial solidworks


Hello friends i tried modeling this primitive mobile (cell) phone of the 90`s in solidworks 2013. Now the model is not a single part, it is a multi body modeling with the cover, back cover, LCD panel and all required parts of the mobile phone and later it is assembled in SolidWorks.

mobile phone modeling tutorial SolidWorks


As you can see in the tutorial, here i have modeled the base part of the mobile phone which have a top cover and back cover using shell and split line feature.

phone modeling tutorial in solidworks


Finally in the tutorial you will have to assemble all the required parts in the solidworks assembly mode.

Solidworks free tutorials

To learn better i have made this tutorial entirely free of cost and you can download the entire solidworks tutorial for mobile phone modeling from our tutorial download stores. Please comment your views about the tutorial.

Thanks.


Read more ...

Tuesday, August 5, 2014

Loft tool in FreeCAD is similar to solidworks

Loft tool freecad solidworks

Hello friends, if you are looking for the loft tool tutorial for FreeCAD then i should say that the loft tool usage is very similar to that of the solidworks.

STEP - 1
Draw two different sketches in freeCAD on two distinct parallel x-y planes.

freecad solidworks loft tutorials

Now for the loft tutorial in freecad and solidworks, i assume that you know the basics of sketching two distinct sketches on two parallel x-y planes in FreeCAD v 0.13.

STEP - 2

loft tutorial in freecad solidworks
Now select the loft tool as shown in the slide.( Loft tool icon in Solidworks and FreeCAD looks almost same)

STEP - 3

loft tutorial in freecad solidworks

Now we are on the final step of the loft tool operation, as shown in the slide select the two sketches in the sketch selection dialog box and press OK. You are done.


Finally the output in FreeCAD. Those who have done modeling in Solidworks can now see how similar both the software are. But Solidwork is expensive and FreeCAD is Open Source.

Watch the Video For This Tutorial 


Or you can watch it on You Tube form This FreeCAD Loft tutorial Video.
Read more ...

Saturday, August 2, 2014

FreeCAD the Open source solution for SolidWorks


FreeCAD solidworks alternative


Welcome to FreeCAD a completely opensource parametric 3D modeler. It is one of the best alternatives for the costly SolidWorks. It is much similar to soildworks modeling technique and if you know modeling in solidworks you can master it within hours. You can find more screenshots of the features at FreeCAD website, you can download it for free from here and also from sourceforge site. FreeCAD can run on windows and linux download for which ever suits you.

Things you can do with FreeCAD.

1. Part Modeling
part modeling in freecad


2. Surface Modeling


I will also be posting tutorials on this software very soon. Friends stay in touch.
Read more ...

Friday, August 1, 2014

SolidWorks 2014 Review the ultimate design software

solidworks 2014 additions


SolidWorks 2014 is considered the best software for 3D modeling for learners or for the professionals, form now on i will be posting again solidworks tutorials for solidworks 2014.

Features of SolidWorks 2014.

Product Design
Machine Design
Facility Design
Read more ...

Thursday, April 22, 2010

Solidworks modeling tutorial of a Helical compression spring

In this solidworks modeling tutorial we will model a helical compression spring.

Select the top plane, draw a circle of your required diameter, that is the base circle of your helical compression spring, based to this circle we will draw the helix curve in this solidworks modeling tutorial of helical compression springs.

 You go to Insert-Curves-Helix/Spiral , from here we create helix curves in solidworks 2010/09, check the slide very carefully , slides are very important in solidworks modeling tutorials


In this step we are creating the helix specify the type of helix curves you want, then specify the height then the pitch or number of revolutions etc.

Then after the helix curve, specify a reference plane normal to the helix cure and set origin on it, after that draw the spring crossection on that plane, then go for the sweep operation by selecting sweep profile as the spring crossection and sweep path as the helix curve and you are done with your solidworks modeling tutorial of the helical compression spring
Read more ...

Solidworks modeling tutorials of the rib and mirror feature

Hi, friends this another solidworks modeling tutorial where you will learn the rib feature and mirror feature of solidworks 3d modeling software, as you can see in the above picture we are going to add a rib in the solidbody, see next silde for details.

If you havent checked the previous tutorials of the rib feature, it will be though for you, this solidworks modeling tutorial is in the continuation of the first feature solidworks modeling tutorial, check out the coincident constraints in the slide, this is necessery for the rib operation to succed.

After the rib feature this is the final output, you need to place the reference plane in the middle of your solidworks model and must be perpendicular to the top plane.

Now, we will check the mirror feature of the solidworks software and in this solidworks modeling tutorial we will try to mirror the rib which we have created in the previous slide on the side shown in the sbove slide.

This is how we do the mirroring of the rib, check the slide very carefully.

And finally the solidworks modeling tutorial of the rib and mirror feature is complete, this is the final model.
Read more ...

How to add the ribs in soliudworks 3d models using rib feature

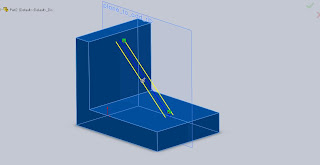
The model shown in the solidworks modeling tutorial is a very simple model, but here in this tutorial we will add ribs in the orthogonal(perpendicular walls)to give bending support to the bracket, have the look in the slide to see where we are trying to add the ribs in this solidworks modeling tutorials.

First, create a plane in the middle of the L shaped bracket as shown in the slide of the solidworks modeling tutorials,this plane has a vital role in adding the rib, by using the rib feature in the solidworks modeling.

    
As shown in the slide, take normal to the plane, and insert a 2d sketch for the solidworks panel with coincident contraints as shown in the figure.


After the sketching exit from the sketch mode and select the rib feature from the solidworks panel or Insert--->Features--->Rib, after selecting the rib feature, your solidworks working space may look similar to my slide, select thickness of the rib and make sure the direction of the rib points to the walls, otherwise the rib feature will not work.Lastly click OK(Tick).


Voila, here we have completed adding the rib, this is the end of this solidworks modeling tutorials.
Read more ...

How to create 2d drawing sheet from 3d solidworks part

This is the 3d solidworks component whose 2d projected drawings we will derive in this solidworks modeling tutorial.Follow the next silde.

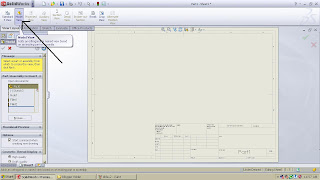
First save your model in the 3d solidworks modeling workspace, then procede according to the slide in the solidworks modeling tutorial.

In this solidworks modeling tutorial, i have selected the default ANSI A4 landscape sheet for the projection drawings, go to model view in  the solidworks top working panel, in the model you will be asked to select different 2d projected views, select which ever views you like for example top, front, side, section views etc.
So, here comes to our final goal, the 2d projected views of the 3d solidworks modeling part, you can add various annotation features here, solidworks is rich in annotation features, edit the sheet format etc, This is the end of this solidworks modeling tutorials, If you like to add someting please comment
Read more ...

Wednesday, April 21, 2010

Solidworks multibody modeling of a torch

This is the solidworks multibody modeling of a torch, completely designed in solidworks and rendered in photo view 360, multibody solidworks modeling is not same as assembly modeling, here firstly the base shape of the component or model is modeled in solidworks, dont get stunned multibody modeling is not a though thing, you can master it within an hour if you follow my tutorials, here firstly i modeled the base body of the torch in solidworks and seperately by selecting planes and surfaces i created each and every part, this is not a solidbody solidworks model every component in the multibody solidworks part can be detached and modeifed or designed sepertately in the same work space, you dont need seperate solidworks file for each sub component in the part.Multibody modeling in solidworks in really a fun thing, you should try yourself, update me your works through comments, tell me what you want more, what type of solidworks modeling tutorials you need.

Best Regards
Read more ...

Saturday, April 17, 2010

Solidworks Modeling of an Inverter and rendered using photo works

 In the solidworks modeling of this funky inveter i have enjoyed myself a lot, this model is purely from the mind with no blueprints whatsoever, but this is a single piece solidworks modeling or rather a multi body modeling, In the multi body solidworks modeling technique the base model is first designed and the the additional features comes, as you can see in the modeling i have used the solidworks default materials or appreances for the front panel display i have used the LED object, i havent used decals here, well if you suggest then i will use some decals with bump mapping. In the rendering process of this solidworks modeling i have used Photo View 360, it is a great stuff by solidworks. I will upload the tutorial very soon.
Regards.
Read more ...

My designed car(SUV)

This is the new SUV i designed in Solidworks

Read more ...

Car Modeling Tutorial

This is how you should start modeling a car in solidworks , download a car blueprint from any free buleprint sites, then crop the blueprints into 4 views ie. front,top,right,back and then attach the views into their respective planes, this will be the base to start your modeling.
In this next silde, you can see that we are using 3dsketch to define the spline curves of the car, we have to define 3 seperate 3d sketches here to make a surface loft, 2 for the sections and one for the guide curve.
This slide is same as above but here we are adding another surface to define the side surface of the car.

This is how we model the hood of the car, you need four 3d sketches to define the surface.

And finally after a painstakign work of 10 hours , i finally completed the car body
wish you all the best for your modeling..
Read more ...

Friday, April 16, 2010

Ford Zapper modeling


Hi, friends this is the Ford zapper 1980 model which i have tried to model in Solidworks 2010 using surfaces, it took nearly 10 hours to model the car, i have not yet completed the wheels, tyres, logo and lot of stuff, dont worry within a short time i will complete it, hopw you have liked the model.In the next post i will start the discussion of the modeling with screen shots. If possible i will upload the video in the youtube or i will upload the solidworks partfile.
Read more ...
Designed By